How to build a Github pages blog using Jekyll
How does one do a blog using Jekyll? I found myself asking the same question after reading a twitter post from Jack Rhysider extoling the simplicity of the github pages blog, and I aimed to find out! The most simple method I could find involved setting up docker and using that since Jekyll and Ruby are notoriously finnicky. Using a prebuilt, consistent environment sounded perfect for the classic use case of “works on my computer”, except now “your computer” is a consistent Dockerized environment!
If you’re on windows, I suggest installing Windows Subsystem for Linux (WSL) and installing docker within that environment. I had tried installing Docker for windows and it made my processor hit 100% usage all too often. Your mileage may vary.
Once you get docker installed, either on Windows directly, or on any old linux host, jump into the commmand line to pull down the necessary images:
You’ll want to update your system, and install docker (I’m using Ubuntu because it’s easiest). If you use some other linux distro, follow your OS’s instructions.
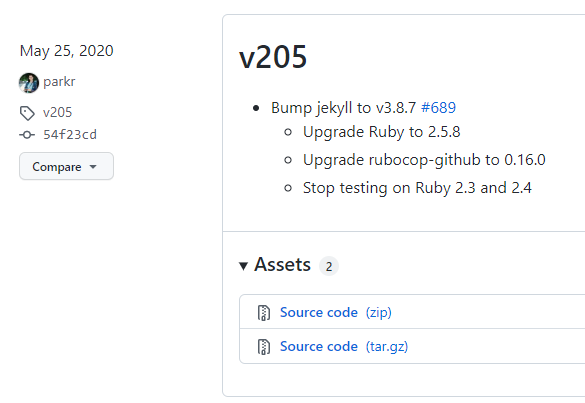
sudo apt-get update -y && sudo apt-get upgrade -y && sudo apt-get install docker.io git -yAt the time of this post, the lastest docker container available for Jekyll was v3.8 - so it’s time to check dependencies and compatibility charts! I ended up having to use an archived release since the latest release of github pages for Jekyll at time of writing used Jekyll v3.9 which you’ll note is newer than the docker container version. Per the initial setup instructions, we must enter a Github pages config version for our _config.yml file to know how to interact with Github appropriately. Per the archived page we checked, I used v205 as I am running Jekyll 3.8.
sudo docker pull jekyll/jekyll:3.8After we pull down our desired version of jekyll, we can start following these refreshingly well written instructions.
# In the linux machine create a folder for your github project
cd ~ && mkdir blog && cd blog
git init blogname.github.io
cd blogname.github.io
mkdir ./vendor/bundle -p
# Start interactive shell with jekyll container and map local directors as volumes
docker run --rm -it --volume="$PWD:/srv/jekyll" --volume="$PWD/vendor/bundle:/usr/local/bundle" jekyll/jekyll:3.8 /bin/bash
# Now inside your jekyll docker container
jekyll new --skip-bundle .
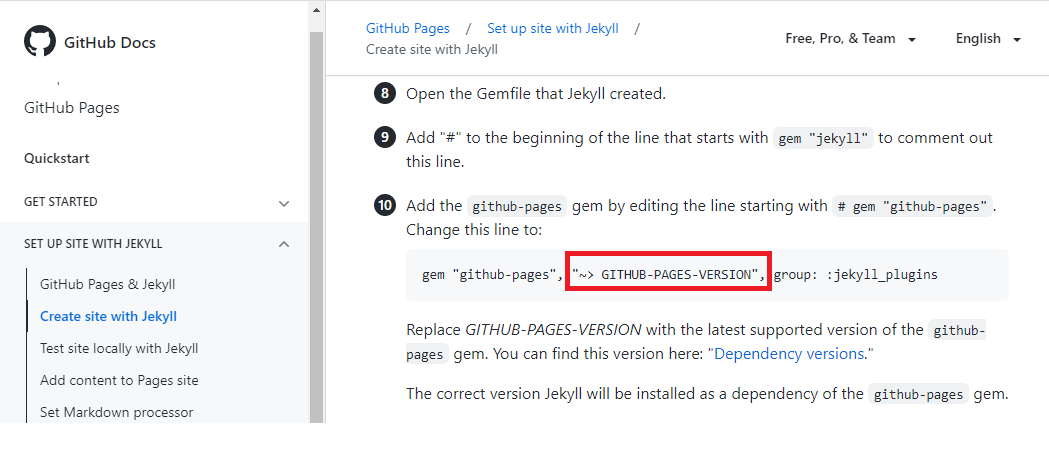
# now follow steps from the github doc page starting @ #8, opening the Gemfile that jekyll created and you're good go!Once you’re done building your page and you write your first post in the _posts directory, save your work and then build and serve your page locally to test, all from inside the docker container!
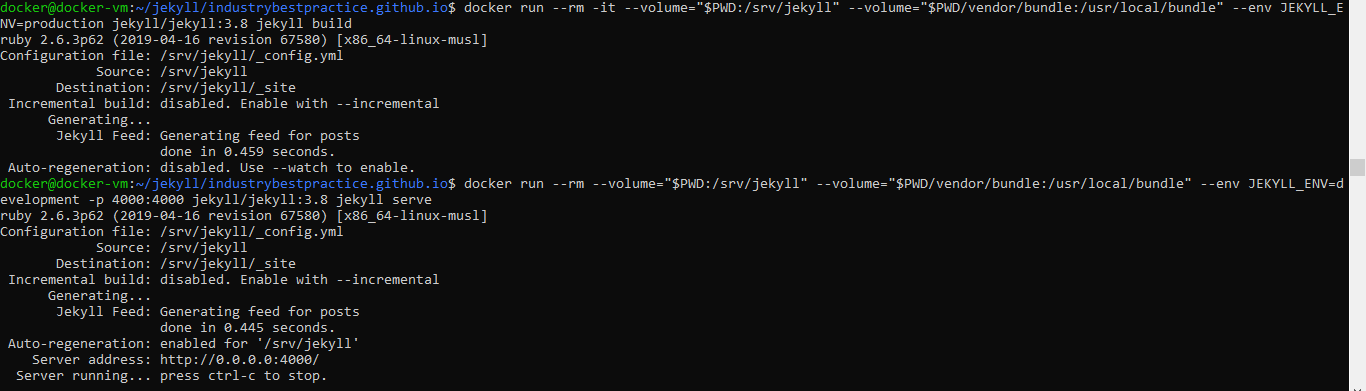
# Building your Jekyll project with Docker
docker run --rm -it --volume="$PWD:/srv/jekyll" --volume="$PWD/vendor/bundle:/usr/local/bundle" --env YOUR_ENV_VARIABLE=your_env_value jekyll/jekyll:3.8 jekyll build
# Serving your Jekyll project with Docker
docker run --rm --volume="$PWD:/srv/jekyll" --volume="$PWD/vendor/bundle:/usr/local/bundle" --env YOUR_ENV_VARIABLE=your_env_value -p 4000:4000 jekyll/jekyll:3.8 jekyll serve
Now just open a web browser one your host computer and navigate to your new site!
Once you’re satisfied with how your project looks locally, just commit and push. The instructions on the github page mention a method to do a pull request to a new branch and then merge to master; however, I find this method of pushing directly to master easiest. Granted, this is a new blog and maybe there is a very good reason to do it the way they mention, but I have not discovered it yet.
I have made some customizations to this site, and used the concept of passing environment variables into my jekyll container at build and serve to change certain variables on my pages depending on if I’m building it locally or planning to push it to Github (i.e. --env JEKYLL_ENV=production), but mostly I stuck with the base minima theme and like it.
Additional links and commands I find helpful to reference as I am writing posts below:
# https://michaelsoolee.com/compile-jekyll-site-docker/
sudo docker pull jekyll/jekyll:3.8

# Building your Jekyll project with Docker
docker run --rm -it --volume="$PWD:/srv/jekyll" --volume="$PWD/vendor/bundle:/usr/local/bundle" --env JEKYLL_ENV=production jekyll/jekyll:3.8 jekyll build

# Serving your Jekyll project with Docker
docker run --rm --volume="$PWD:/srv/jekyll" --volume="$PWD/vendor/bundle:/usr/local/bundle" --env JEKYLL_ENV=development -p 4000:4000 jekyll/jekyll:3.8 jekyll serve

# Run jekyll container interactivley
docker run --rm -it --volume="$PWD:/srv/jekyll" --volume="$PWD/vendor/bundle:/usr/local/bundle" jekyll/jekyll:3.8 /bin/bash

# Jekyll categories setup
https://blog.webjeda.com/jekyll-categories/

# How to setup github pages official doc
https://docs.github.com/en/pages/setting-up-a-github-pages-site-with-jekyll/about-github-pages-and-jekyll
# Jekyll official doc
https://jekyllrb.com/docs/step-by-step/08-blogging/
# Jekyll override theme
https://jekyllrb.com/docs/themes/#overriding-theme-defaults
# markdown guide
https://www.markdownguide.org/tools/jekyll/